Club Assembly
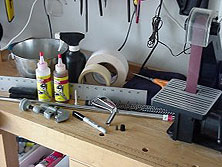
| What's Needed? | ||
| clubhead | shaft | grip |
| two-part epoxy | tube cutter | 2" 2-sided tape |
| masking tape | ferrule (if required by clubhead) | 48" steel ruler |
| medium and fine grit sandpaper or 1" sanding belt |
vise | shaft protector |
| scissors | mineral spirits | cloth rag |
| paint tray | golf tee | permanent marker |
Step-by-Step Procedure
The following procedure applies to club assembly with steel shafts. Deviations to this procedure for graphite shafts will be noted in a separate procedure.
1. PREPARE SHAFT
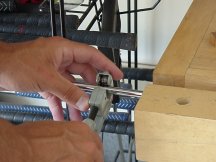
Most shafts require the tips to be trimmed in order to achieve the proper flex rating. Typically, shaft manufacturers provide detailed instructions with the shaft. These instructions vary between manufacturers. It is recommended that the instructions provided are followed closely. Using a ruler and permanent marker, mark the tip of the shaft at the length indicated by the instructions. Next, use the tube cutter to cut the shaft. File down any remaining burrs on the shaft's tip with a metal file.
Next, insert the shaft into the clubhead. Use a piece of masking tape to mark the depth of the hosel. Remove the shaft from the clubhead and add a second piece of masking tape approximately 3/8" overlapping the first piece. This is not necessary if a ferrule is required by the clubhead.
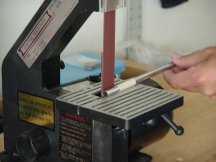
Epoxy adheres better to a roughened surface so using medium grit piece of sandpaper or a 1" sanding belt, sand the shaft tip until the shiny finish has been removed. Once this step is completed, apply mineral spirits to a soft cloth rag and clean the shaft by wiping the sanded tip.
Safety Note: Use caution when cutting steel. Avoid hand contact with metal shavings.
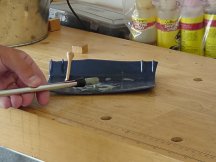
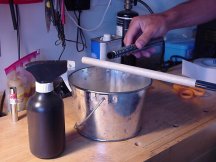
2. EPOXY COMPONENTS
Most modern shafting epoxies come in two parts. Part A is the "activator" and Part B is the "base". Mix equal parts of A and B on a clean dry surface. Use a golf tee, ice cream stick, or tongue depressor to thoroughly mix the parts. Next roll the end of the shaft tip in the epoxy mix. Ensure that the entire tip is covered. Insert the shaft into the clubhead with a turning motion so that the entire inside of the hosel is covered with epoxy. Align the shaft as desired. Usually it is best to align any graphics on the shaft so that they can not be seen when the club is at address. Wipe excess epoxy off the shaft and clubhead. Finally stand the club up right and allow to dry for 24 hours at room tempurature.
Safety Note: Remember, when using mineral spirits and epoxy, ensure that the work area is properly ventilated.
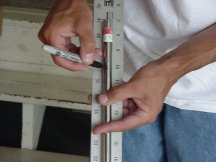
3. TRIM FINAL LENGTH
Using a 48" steel ruler, lay the club on top of the ruler as at address. Ensure that the club is soled properly and make a mark at the disired length. Use a length reference table for recommended club lengths. There are no "standards" for club lengths within the equipment industry. Note that these lengths are recommended as a starting point. Several factors should be considered when fitting club length including golfer's height, arm length, swing characteristics, and other performance parameters. It is recommended that an accredited clubmaker is used for proper fitting. The Professional Clubmaker's Society (PCS) provides a clubmaker referral system.
Use the tube cutter to cut the shaft. Again, file down any remaining burrs from the shaft and wipe clean with mineral spirits applied to a soft cloth rag.
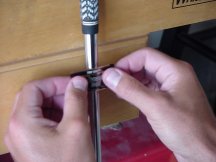
4. GRIP
Place the grip next to the shaft with the end of the grip lined up with the end of the shaft. Using a permanent marker place a mark on the shaft approximately 1/2" toward the butt end of the shaft. Measure the length of 2-sided tape needed by starting the tape on the mark made earlier and extending the tape approximately 1" beyond the butt end of the shaft. Cut the tape using scissors. Apply tape to shaft by placing the tape lined up with mark and shaft in center of the tape. Wrap tape around the shaft vertically one side at a time. Tape will overlap slightly. Leave tape backing on at this point.
Secure the club in the vise. Remove tape backing. Insert a golf tee into the hole in the end of the grip. Pour mineral spirits into the grip until it is approximately half full. Place an index finger over the opening of the grip and shake up the grip up and down to spread the mineral spirits over the inside of the grip. Place the paint tray under the club. Pour contents of the grip onto the exposed tape thoroughly. Next, pinch the opening of the grip between your thumb and index finger. Place the grip opening over the butt end of the shaft and slide grip in place ensuring that the shaft is inserted into the grip completely.
It is important to align the grip properly. Most grips are designed with alignment aids on both ends of the grip. These should be aligned on the shaft and in line with the club's face angle.
Procedure Note: This procedure uses 2" 2-sided tape. 1" 2-sided tape can also be used. A single strip could be used and overlap the shaft or a strip placed in a spiral manner on the shaft could also be used.
5. FINISH
If a ferrule was used on the club, it will require turning. Turning is the process for smoothing the ferrule until it is flush with the clubhead hosel. This can be done using fine grit sandpaper. Caution should be taken to ensure that the clubhead finish is not scratched. A preferred method is to apply Acetone thoroughly to a soft cloth rag and spin in your hand until th eferrule is flush with the hosel. This may require several spins. Acetone can be used to wipe the ferrule and restore its original luster. Next, clean the entire club.
Finally, apply the shaft band below the grip on the shaft. Recommended location is between 1"and 3" below the grip between steps in the shaft. If the shaft has two flexes indicated, make sure that the appropriate flex is showing when the band is applied.
Safety Note: Remember, when using Acetone or similar products, ensure that the work area is properly ventilated and use gloves to protect the skin.
|